Guidelines Ruler
Packed with Features
No Other Ruler Offers,
😎 It's a Cooler Ruler!
▶️
6" x 12" Guidelines Ruler
Sold out
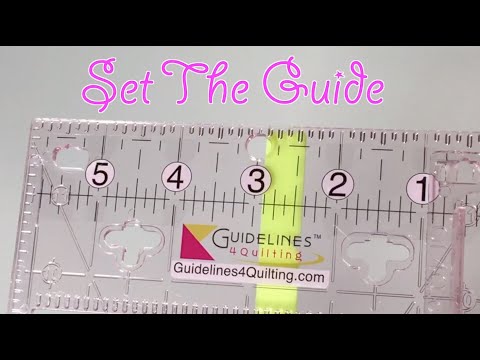
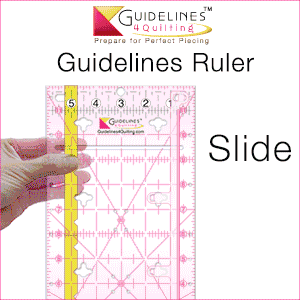
The ruler’s underside has grooves every 1/8", and the Fabric Guide’s matching teeth lock into them at five locations for accurate alignment.
Set Options
With Connectors
Monica Langevin / Canada
"I love having a long ruler to trim quilt edges before binding. These rulers can be as long as you want, they are stable & most of all, safe."
6"x12" Guidelines Ruler
Packed with features no other ruler offers,
😎 It's a Cooler Ruler!
Connect them
as many as you want!
Every Guidelines Ruler comes with:
- Built-in Grip Strips
- Fabric Guide
- Finger Guard
- Angle Line Marker

How-To:
Sold out
▶️
Accurate & Connectable
The ruler’s underside has grooves every ⅛", and the Fabric Guide’s matching teeth lock into them at five locations for accurate alignment.
Self-Aligning | Non-Slip | Connectable | Unbreakable | Safe | Left-Hander Friendly
Guidelines Ruler Set Options & Spare Parts
Connect with Guidelines Ruler Connectors
2-Ruler Set
3-Ruler Set
4-Ruler Set
Sold out
Sold out
Free US Shipping
Sold out
Free US Shipping
5-Ruler Set
Connector
Spare Fabric Guide
Sold out
Free US Shipping
Sold out
Sold out
*** Choose the 3, 4 or 5-Ruler Set if you want to square up your fabric the super easy way.***
Monica Langevin
Saskatchewan, Canada
"I love having a long ruler to trim quilt edges before binding. These Rulers can be as long as you want, they are stable & most of all, safe."
Mary-Ruth / San Antonio, TX
"I am traveling across country. I already use the 24" package (2-ruler set) and just love it. It and my 1/4" paper piecing ruler are just about the only ones I use. I have replaced almost all my rulers with yours..."
Every Guidelines Ruler comes with built-in Grip Strips,
Fabric Guide, Finger Guard, and Angle Line Marker
More Set Options that Include Guidelines Rulers:
Perfect4Pattern Set Options with Free 6-Pack Seam Guides ($4.99 value)
Every P4P set comes with a Super Easy Seam Guide Setter that lets you sew accurate scant 1/4" seam allowances:

Sold out
Sold out
Sold out
Sold out
Free US Shipping
- One 6"x12" Rulers
- Super Easy Seam Guide Setter with 6 Seam Guides
- Free Gift (6-Pack Seam Guides $4.99 value)
- Two 6"x12" Rulers
- One Connector
- Super Easy Seam Guide Setter with 6 Seam Guides
- Free Gift (6-Pack Seam Guides $4.99 value)
Make a 6"x24", 12" square or a corner square to square up your fabric folded twice off the bolt.
- Three 6"x12" Rulers
- Two Connectors
- Super Easy Seam Guide Setter with 6 Seam Guides
- Free Gift (6-Pack Seam Guides $4.99 value)
Make a 6"x24", 12" square, 3-foot ruler or a corner square to square up your fabric folded once off the bolt.
Finished-Size Quilting Set Options
Cut & Sew Accurately and
Make Blocks Any Size
No Math. No Expensive Dies:
All the FSQ sets include:
- Guidelines Rulers and the Prep-Tool to cut and sew accurately.
- Seam Allowance Additions to make blocks any size, accurately, No Math!
- Prep-Tool to trim triangle points
- Super Easy Seam Guide Setter
Guidelines4Quilting
© 2026 Guidelines4Quilting All rights reserved.