Grip Strips
(6 per pack)
Grip Strips for Quilting

▶️
▶️
Grip Strips
Trio
Sold out
Sold out
▶️
-
Six 11¾" long strips per pack
-
Repositionable. Leave no sticky residue
-
Crystal clear
-
Bend to fit curved edges
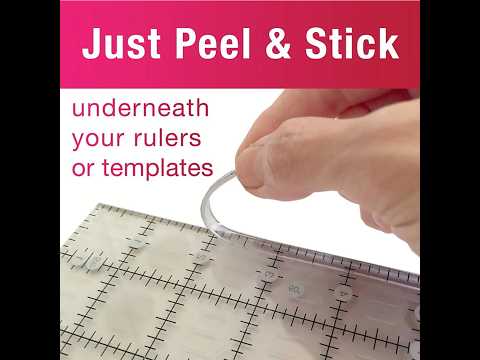
Slide easily over your fabric when lining up, but just a little pressure will lock your rulers or templates in place while cutting.
Terry Chase
Winter Springs, FL
"Grip strips are a god send on square rulers where precision is everything. Also, since they raise the ruler slightly, you can easily work them over bulky seams that need to be cut."
Peel & Stick on the edges of any rulers or templates, even those with curved edges.
Join 1,000s of Quilters & Slip Proof Your Quilt Rulers & Templates
Our peel-and-stick Grip Strips help keep everything in place
With minimal pressure, even those with curved edges.
Grip Strips
Sold out
Grip Strips Trio
Sold out
▶️
Includes: Six 11¾" long Strips
-
-
- Crystal Clear
- Repositionable: No sticky residue
- Cut or bend to fit on curved edges.
- Slide easily over your fabric when lining up, but just a little pressure will lock your rulers
or templates in place while cutting.
-
Crystal Dudley
La Crescenta-Montrose,CA
"My rulers don’t move while I’m cutting, and I get smooth straight cuts.
I have been removing those dots and replacing them with Grip Strips on all my rulers."
Sheila Kester's post on Quiltingboard.com
"I am about to bust with joy at the new item I found! ...There is no more walking your hand as you cut! ...I even talked to a complete stranger about them."
Terry Chase
Winter Springs, FL
"Grip strips are a god send on square rulers where precision is everything. Also, since they raise the ruler slightly, you can easily work them over bulky seams that need to be cut."
Cut or bend to fit any size
or curved edges.
Just Peel & Stick
Perfect!
Attach them right up to both edges but not beyond
Attach them as close as possible to the edges.
Attach on both edges, so your ruler won't tilt on one side.
Don't skimp on them.
When you leave a gap, it will cause ripples in your fabric.
How to use Grip Strips
Just Peel & Stick Grip Strips (11¾” long) underneath your rulers or templates. Put them on as close as possible to the edges.
What's included in the Quilt Ruler Upgrade Kit.
For Both Right and Left-Handed Use.
Works on 12" / 12½” and 24" / 24½” rulers.
Grip Strips
slip-proof your rulers.
- 6 crystal clear strips. 11¾” x ¼".
- Repositionable. Removable.
- Leave no sticky residue
Two Fabric Guides
- Clip-on Guides with built-in industrial strength stretchy bands.
- The 24" Fabric Guide is folded in half in the package.
Guide Lock Strips
- Two paper thin 5”x ½” strips
- Important: Attach them on your 24” ruler, so the 24” Fabric Guide does not shift in the middle while butting up against your fabric.
Grip Strips and Fabric Guides are the same thickness,
so everything stays perfectly level.

Step 1: Peel & Stick Grip Strips on Your 12" & 24" Rulers.
Six strips are included in the Kit.
Two for your 12" ruler and four for your 24" ruler.
Peel crystal clear Grip Strips (11¾” long) off the brown backing paper.
Perfect!
Attach them as close as possible to the edges of your ruler.
Attach on both edges, so your ruler won't tilt in one side.
Don't skimp on them. When you leave a gap in between, it will cause ripples in your fabric.
Step 2: Attach Guide Lock Strips on Your 24" Ruler.
Guide Lock Strips keep the long, 24” Fabric Guide, from shifting in the middle underneath your ruler no matter how much fabric you are lining up to.
Note: You don't need them on your 12" ruler.
Guide Lock Strips come with permanent adhesive.
Get extra strips here if you have more than one 24" ruler or in the case your ruler breaks.
Step 3: Clip the Fabric Guides onto Your 12" & 24" Rulers.
Important: Keep the Fabric Guides Straight.
The Fabric Guides are made of tough polypropylene, but they have to be very thin to fit under your ruler. Be sure not to bend them when you slide them on or slide them off.
- Slide one hook onto one end of your ruler.
Square Up Cut & Sew Accurately
Watch the video below, showing how to square up, cut & sew quilt pieces accurately. No more slipping rulers! No more lining up by eye!
Perfect!
Attach them right up to both edges but not beyond.
Attach them as close as possible to the edges of your ruler.
Attach on both edges, so your ruler won't tilt on one side.
Don't skimp on them. When you leave a gap in between, it will cause ripples in your fabric.
Did You Know?
The Quilt Ruler Upgrade Kit includes Grip Strips
and Fabric Guides for your 12" and 24" rulers
to help you cut faster and more accurately.
Sold out

▶️
-
For Both Right and Left-Handed Use.
-
The Quilt Ruler Upgrade Kit works with 12" & 24" (or 12½”& 24½”) long and ⅛" thick standard quilt rulers of any brand.
Did You Know?
Six Grip Strips are included in the Quilt Ruler Upgrade Kit?
▶️
Quilt Ruler Upgrade Kit
-
Works with 12" & 24" (or 12½”& 24½”) long and ⅛" thick standard quilt rulers of any brand
-
Left-Handed Friendly
Sold out
The Upgrade Kit Includes:
- 6 Grip Strips for your 12" & 24" rulers
- 2 Fabric Guides for your 12" & 24" rulers
- 2 Guide Lock Strips for your 24" ruler
Crystal Dudley
La Crescenta-Montrose,CA