The key to getting a sharp
mitered corner is to stop sewing
at the right distance from the edge.
1) Miter the Corners
Watch the video below:
Eliminate the guesswork with
the Prep-Tool & Sewline Pencil
Sold out
Other Popular Products
Sold out
Sold out
Sold out
Sold out
Sold out
Non-Slip
Connectable
Sold out
Scroll down for complete instructions
For sharp mitered corners, you need to
stop sewing at the correct distance from the edge.
Take the guesswork out with the Prep-Tool by Guidelines4Quilting and the Bohin Mechanical Pencil.
Sharp Mitered Corner Set
(Prep-Tool + Bohin Pencil)
Sold out
1) Miter the Corners
Watch the video below:
2) Join the Ends
Join the strips' ends with
the same diagonal seam we used
to join the strips, forming a square
with the overlapped part.
SLIDESHOW:
Swipe left or use the arrows
to view all 12 steps below:
1) Overlap the ends of the strips.
2) Since we started with a 2 1/2" strip, we want the overlapped part to be 2 1/2".
3) Line the edge of the Fabric Guide up to the bump created by the end of the strip underneath.
Mark along the edge of the ruler where the strip on top overlaps the strip underneath by 2½".
4) Cut on the line you marked, and the strips will now overlap each other by 2½".
5) Open both strips. Then fold & clip the quilt top between them to bring the ends closer together.
6) Rotate one strip so that you can line them up, right sides together at a 90-degree angle, just like you did when you joined the strips.
The overlapped section, shown in green, will be a 2½" square. Insert a pin just above the center of the square as shown.
7) Unfold the quilt top and check to see that the strip will lay flat. You may need to rotate the top strip in the opposite direction if the binding is twisted and won't lay flat.
8) Refold the top and mark from corner to corner.
9)
10)
11)
12) Finish stitching the binding to the top, back-stitching
where you start and stop.
3) Hand-Stitch the Binding
to the Back of the Quilt
SLIDESHOW
Swipe left or use the arrows
to view all 19 steps below:
1) Fold the strip up and press it flat to prepare to fold it to the back.
2) Use a sharp, hand-sewing needle. A needle designed for applique works well.
Thread the needle using about 18 inches of matching thread. Much longer than that can get tangled and form knots as you are working it through the fabric.
3) Use a single thread, not doubled, and tie a quilter's knot at the end.
Note: To make a quilter's knot, wrap the end of the thread three times around the needle. Then pull the needle through, hanging on to the loops to pull the knot tight.
4) Leave about a 6" tail on the end of the thread without a knot, so the single strand won't come out as you pull it through.
5) Start somewhere in the middle and bury your knot under the binding strip.
6) Fold the binding to the back of the quilt over the knot, and clip it in place.
The Knot and the end of the thread will be hidden under the binding.
7) Take a stitch into the backing and batting, being careful not to go all the way through to the other side.
Go from ⅛" to ¼", parallel to the binding strips folded edge, then come up and catch a little bite of the edge of the binding.
8) Go back into the backing and batting right at the same spot and go another ⅛" to ¼" and again up into the edge of the binding.
This is called a "Blind Stitch" and it gives a very attractive, almost invisible finish.
9) This shows the little bites into the binding in white, but with matching thread, they will be practically invisible.
Every few stitches, gently pull the thread tight to take out any slack and bury the stitches.
10) When you run out of thread, make a loop and pull the needle through to make a knot.
11) Run the needle through a spot under the binding to hide the thread and then cut off any remaining tail.
12) When you get to a corner, take one last bite of the binding right at the seam line from where you machine-stitched the binding to the front.
13) You will need to manipulate the fabric to form nice 45º miters on both the front and back.
Then take a bite out of the binding in the folded corner.
14) Run the needle up between the layers of binding right along the 45º folded edge.
15) Take a couple of tiny stitches, catching both sides of the miter, to close and secure it in place.
16) You can slip the needle all the way through to the front to secure the miter on the front side also.
17) Slip the needle back through to the back side coming out near the corner.
18) Continue blind-stitching all the way around.
19) When you get back where you started, tie a knot and then bury the thread going back in right at the knot, between the layers, and then clip off any remaining tail.
Done!
Your quilt is now bound with a durable double layer of binding and practically invisible stitching.
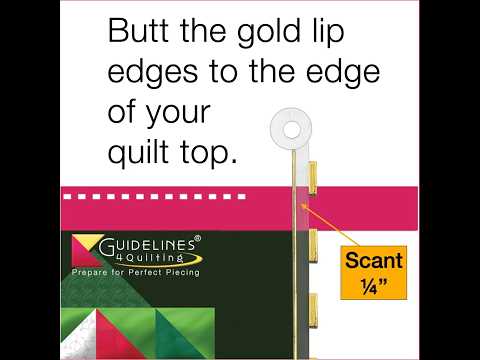
For Sewing an Accurate Scant ¼" Seam, Use:
Super Easy Seam Guide Setter
Sew accurate scant ¼" seams for
pointy points & accurate patches

“This is the best tool I have found in 35 years... I cannot believe how much better my blocks fit.
If you are on the fence about this product, do not hesitate to purchase it.”
Saundra P Marquis' comment
on Facebook
Sold out
Prep-Tool
Sold out
The Prep-Tool assists
with precise set-in seams

The Prep-Tool also helps
with accurate point trimming
For Sewing an Accurate
Scant ¼" Seam, Use:
Super Easy
Seam Guide Setter
Sew accurate scant ¼" seams
Super Easy Seam Guide Setter
“This is the best tool I have found in 35 years... I cannot believe how much better my blocks fit.
If you are on the fence about this product, do not hesitate to purchase it.”
Saundra P Marquis' comment
on Facebook
Sold out
6-Pack Seam Guides
Quilters' Favorite:
- Perfect height for
double-layer fabric
- No Sticky Residue
Sold out
Guidelines4Quilting
© 2026 Guidelines4Quilting All rights reserved.