Prep-Tool
with 8-Page booklet
Scant ¼" Tool + Point Trimmer
Sewline Pencils with
Green & White Refills
Sold out
Sold out

Check the Accuracy of
Your Scant ¼" Seam Allowances
Line the gold lip edges of the Prep-Tool up to the edge of the pieces of fabric you've sewn together.
You should see the stitching line right along the inner edge of the Prep Tool.
- If it's inside the edge, you need to adjust the Seam Guide farther away from the needle.
- If it's outside the edge, you need to adjust the Seam Guide closer to the needle.
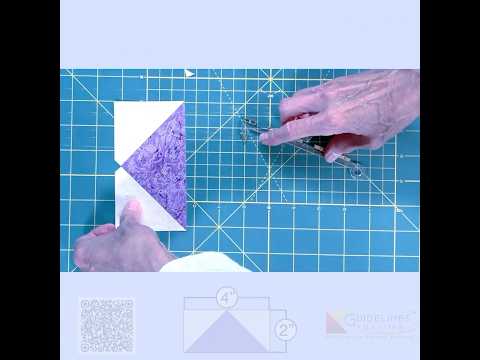
The Prep-Tool is also
a Point Trimmer

HSTs and QSTs match
the Squares after trimmming.
Trim HSTs along its short sides
Trim QSTs along its long sides

Popular Tools
Made of Polycarbonate,
Virtually Unbreakable
1) Mark precise seam lines for sharp mitered binding corners.
Prep-Tool with
8-Page Booklet
Sewline pencil
with refills
Sold out
Sold out
2) Take the Guesswork out of Set In Seams


The Prep-Tool is also
a Point Trimmer:

HSTs and QSTs match
the Squares after trimmming.
Trim HSTs along its short sides
Trim QSTs along its long sides
- One peel-and-stick, self-adhesive Seam Guide with removable, reusable adhesive. They are 1/32" thick making it easy to align and guide your fabric accurately before it gets under your needle.
- 8-page instruction booklet
8-Page Booklet
Tools related to this item
Tools related to this item

Extra 6-Pack
Seam Guides
Gray refills
for Bohin Pencil
Sold out
Sold out
Sold out
Sold out
Sew Scant ¼" Seam Allowances
A Scant ¼” is just slightly less than a full ¼” &
the reason it's used for quilt piecing is actually pretty simple.
Super Easy
Seam Guide Setter
Sold out

▶️
Sold out
Sew Scant ¼" Seam
Allowances
A Scant ¼” is just slightly less than a full ¼” & the reason it's used for quilt piecing is actually pretty simple.
The set includes:
- Prep-Tool with 8-page booklet
- Super Easy Seam Guide Setter with 6 seam guides
- Bohin Pencil with gray & white refills
- 6-Pack Seam Guides
Sold out
6-Pack
Seam Guides
Sold out
Quilts Made Using Prep-Tool by Guidelines4Quilting.
Bonnie Beaty - CA Road to California Contest Entrant
"It was such a wonderful experience for me to take the leap and enter this quilt at Road. I am fairly new to quilting and to have my quilt accepted was quite an honor. This quilt truly stretched my quilting abilities and improved my confidence greatly.
I used a few of the tools offered by Guidelines4Quilting. I used the Guideline Rulers to cut the strips. I really like the ability of butting the ruler up to the fabric and knowing that it is straight and square.
I used the Prep-Tool to prepare the triangles. The Prep-Tool really does make for more accuracy when sewing triangles together and I needed accuracy on the triangle units of this quilt. Triangles have always been a bit of a challenge for me, so having tools that make it easier and actually work is great.
I tell everyone about Guidelines Rulers and at a recent quilt retreat I gave a demo on the Rulers, Prep-Tool and Grip Strips. I have the Grip Strips on almost all my rulers and just ordered another two packages for the rest of them. Thanks for the great products.”
This beautiful Lemoyne Star quilt was made by Sharon Vervoort of California and it was accepted into Road to California. It's the first quilt she had ever entered in a contest and it took third place.
She says one of her secrets to win this award was using the Prep-Tool to mark the seam intersections for the precise Set-in-Seams on the Lemoyne stars. Congrats, Sharon!
Quilts Made Using
Prep-Tool by Guidelines4Quilting
Bonnie Beaty - CA Road to California Contest Entrant
"It was such a wonderful experience for me to take the leap and enter this quilt at Road. I am fairly new to quilting and to have my quilt accepted was quite an honor. This quilt truly stretched my quilting abilities and improved my confidence greatly.
I used a few of the tools offered by Guidelines4Quilting. I used the Guideline Rulers to cut the strips. I really like the ability of butting the ruler up to the fabric and knowing that it is straight and square.
I used the Prep-Tool to prepare the triangles. The Prep-Tool really does make for more accuracy when sewing triangles together and I needed accuracy on the triangle units of this quilt. Triangles have always been a bit of a challenge for me, so having tools that make it easier and actually work is great.
I tell everyone about Guidelines Rulers and at a recent quilt retreat I gave a demo on the Rulers, Prep-Tool and Grip Strips. I have the Grip Strips on almost all my rulers and just ordered another two packages for the rest of them. Thanks for the great products.”
This beautiful Lemoyne Star quilt was made by Sharon Vervoort of California and it was accepted into Road to California. It's the first quilt she had ever entered in a contest and it took third place.
She says one of her secrets to win this award was using the Prep-Tool to mark the seam intersections for the precise Set-in-Seams on the Lemoyne stars. Congrats, Sharon!